I’ve spent over a decade fixing designs that looked almost right but something was off.
You know that feeling when your layout just doesn’t sit right? Elements seem close to aligned but not quite. Spacing looks inconsistent. The whole thing feels messy even though you can’t pinpoint why.
Guides fix that.
Here’s what most designers miss: guides aren’t just lines you slap on your canvas. They’re a system for building precision into everything you create.
I’m going to show you how to use guides in Photoshop at GFX Projectality. Not the basic stuff you can find in any manual. The strategic approach that separates amateur work from professional layouts.
This tutorial covers web designs, print projects, and everything in between. You’ll learn when to use guides, how to set them up fast, and the techniques I use daily to keep my work pixel-perfect.
No more eyeballing alignment. No more inconsistent margins that make your client squint at the screen.
Just clean, balanced designs that look intentional from the first glance.
What Are Photoshop Guides and Why They Are a Designer’s Best Friend
Guides are non-printing lines in Photoshop. That’s it.
They sit on your canvas while you work but never show up in your final export. Think of them as invisible rulers that help you place things exactly where they need to go.
Some designers say they don’t need guides. They eyeball everything and claim it works just fine. And sure, if you’re doing quick social media graphics, maybe you can get away with it.
But here’s what I’ve learned working on projects at GFXprojectality.
The second you need REAL precision? You need guides.
They give you symmetry without guessing. They keep your margins consistent across multiple artboards. They let you build on grid systems that actually make sense (something every designer in Lilburn and beyond should care about).
When you learn how to use guides in photoshop gfxprojectality style, you’re not just aligning boxes. You’re creating visual hierarchy. You’re establishing rhythm in your compositions.
Your designs start to FEEL more balanced because they actually are.
Here’s where you start. Press Ctrl + R on Windows or Cmd + R on Mac. That shows your rulers. No rulers means no guides. Simple as that.
Once those rulers appear along the top and left edges of your canvas, you’re ready to pull guides onto your workspace.
That’s your foundation right there.
The Fundamentals: Creating, Moving, and Managing Your First Guides
Let me show you how to actually use guides in Photoshop.
Most people know guides exist. They just don’t know how to work with them properly. So they either avoid them completely or fumble around trying to get them where they need to be.
I’m going to break this down step by step.
Creating Horizontal & Vertical Guides
First, make sure your rulers are visible. If you don’t see them along the top and left edges, hit Ctrl+R (Cmd+R on Mac).
Now click anywhere on those rulers and drag onto your canvas. Drag from the top ruler to create a horizontal guide. Drag from the left ruler to create a vertical guide. As you immerse yourself in the world of Gfxprojectality, remember that precise guide placement can transform your creative process, allowing you to drag effortlessly from the rulers onto your canvas to establish a harmonious layout.
Here’s a quick tip. Hold Shift while dragging and your guide will snap to the ruler tick marks. Makes placement way easier when you need something at a round number.
Precision Placement with the ‘New Guide’ Dialog
Sometimes eyeballing it isn’t enough. You need a guide at exactly 500 pixels from the top or maybe at 33.3% across your canvas.
Go to View > New Guide. A small dialog pops up where you can choose horizontal or vertical, then type in your exact position. You can use pixels, percentages, or whatever unit your ruler is set to.
This is how to use guides in photoshop gfxprojectality when you need pixel-perfect accuracy.
Manipulating Guides
Grab your Move Tool by hitting V. Now you can click directly on any guide and drag it to a new position.
Want to change a horizontal guide to vertical? Hold Alt (Option on Mac) while you click and drag it. The orientation flips.
Once you’ve got your guides positioned, you’ll want to lock them so you don’t accidentally move them. Go to View > Lock Guides or hit Ctrl+Alt+; (Cmd+Option+; on Mac).
Clearing and Removing Guides
Getting rid of guides is simple. Just drag them back off the canvas onto the ruler area. They disappear.
Need to clear everything at once? View > Clear Guides wipes them all out in one shot.
If you only want to remove specific guides, you can also use View > Clear Selected Guides after selecting the ones you want gone with your Move Tool.
That’s it. You now know what are smart guides in photoshop gfxprojectality and how to manage regular guides like a pro.
Advanced Techniques: Guide Layouts and Smart Guides
You’ve been creating guides one at a time.
Clicking and dragging from the ruler. Over and over. It works but it takes forever when you need a full grid system.
There’s a better way.
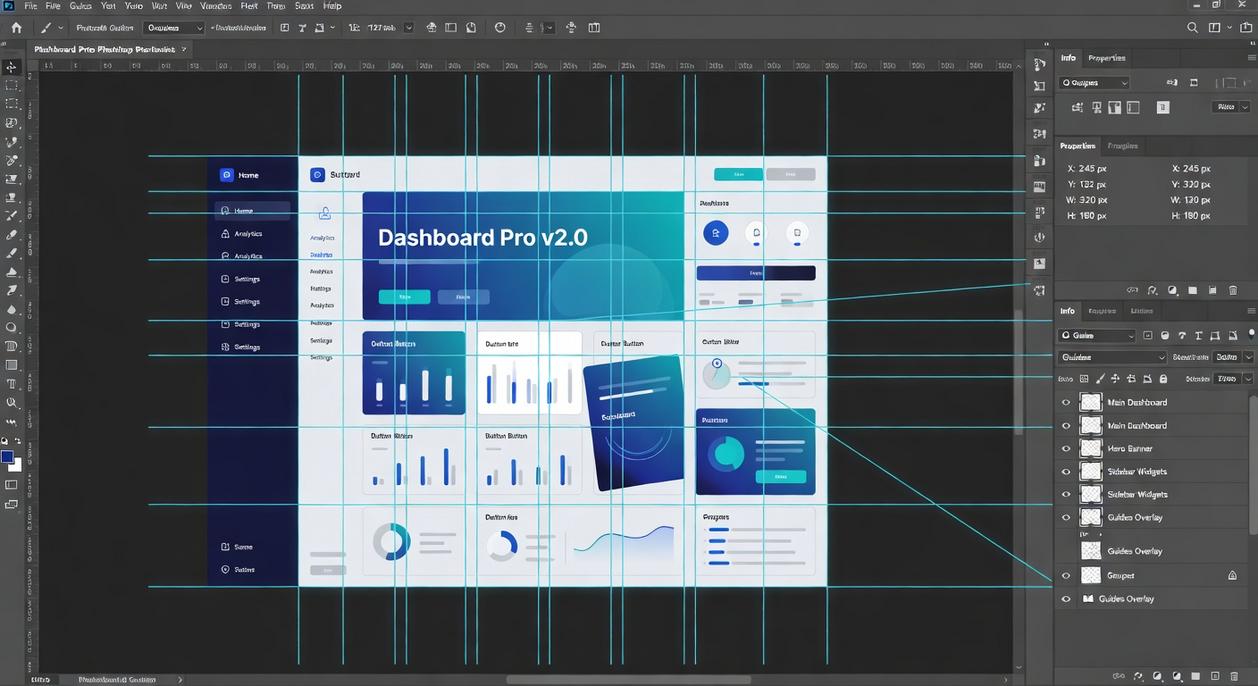
New Guide Layout does the heavy lifting for you. Go to View > New Guide Layout and you’ll see options that let you build complex grids in seconds.
Here’s how it works.
You can set up columns and rows with exact measurements. Want a 12-column grid for a website mockup? Type in 12 columns. Add gutter spacing between them (I usually go with 20px). Set your margins and you’re done.
The whole grid appears instantly.
I use this constantly when I’m working on web designs in photoshop gfxprojectality. A standard 1200px wide layout with 12 columns takes about 10 seconds to set up. Compare that to creating 24 guides manually (you need guides on both sides of each column). When designing a standard 1200px wide layout with 12 columns in Photoshop Gfxprojectality, understanding “What Are Smart Guides in Photoshop Gfxprojectality” can drastically reduce your setup time, allowing you to focus more on creativity rather than tedious manual adjustments.
Photo galleries work the same way. Need a 4×3 grid for product shots? Set 4 columns and 3 rows. Adjust your gutters to match the spacing you want between images.
But here’s where things get REALLY useful.
Smart Guides change everything about alignment. These are the magenta lines that pop up automatically when you move objects around. They show you when something lines up with another element or with the canvas itself.
Most people don’t even know they exist.
Turn them on by going to View > Show > Smart Guides. Now when you drag a layer, you’ll see those magenta lines appear when your object aligns with centers, edges, or other elements.
No more guessing if something is centered. The Smart Guide shows you the exact moment it lines up.
I was working on a button layout last week. Had to align six buttons in two rows. Without Smart Guides? I’d be zooming in and checking pixel positions. With them? I just dragged each button until the magenta lines appeared.
Done in 30 seconds.
Smart Guides work with the edges of your canvas too. So when you’re trying to center something on the page, you’ll see guides appear at the horizontal and vertical center points.
The best part about learning how to use guides in photoshop gfxprojectality is that these techniques stack. You can set up your grid with New Guide Layout, then use Smart Guides to position elements within that grid.
Your workflow gets faster and your designs get cleaner.
Practical Application: Setting Up a Professional Business Card Layout
Let me show you something that’ll save you from a printing disaster.
You know those business cards that come back with text cut off at the edges? Or logos that sit way too close to the corner?
That happens because people skip the setup.
I’m going to walk you through how to use guides in photoshop gfxprojectality to build a business card the right way. We’re talking about a standard 3.5 x 2-inch card with proper bleed and safety margins.
Here’s what this gets you. Your printer won’t reject your file. Your text stays readable. And you look like you actually know what you’re doing.
Step 1: Set Your Bleed
Open your document and create guides 0.125 inches from every edge. This is your bleed area. When the printer cuts your cards, slight variations won’t leave white edges on your design.
Think of it as insurance against imperfect cutting machines.
Step 2: Mark Your Safety Zone
Now create a second set of guides 0.125 inches inside the trim line. This is where your important stuff lives. Your name, phone number, logo. Anything you actually need people to see.
Keep everything inside this zone and you’re golden.
Step 3: Align Your Content
Use additional guides to line up your logo and contact info. This keeps everything clean and intentional instead of randomly placed. To achieve a polished and professional design in your gaming graphics, embracing the principles of Photoshop Gfxprojectality will ensure that your logo and contact information are neatly aligned, enhancing the overall aesthetic and functionality of your project.
The result? A card that prints exactly how you designed it. No surprises when you open that box from the printer.
Your New Foundation for Flawless Design
You now have the complete skill set to use guides in Photoshop.
From basic placement to advanced automated layouts, you can handle it all.
No more guessing at alignment. No more designs that lack professional polish.
When you integrate guides into your workflow, everything changes. You build every project on a foundation of precision and structure.
Here’s what you need to do right now: Open a new Photoshop document. Don’t wait.
Create a 12-column grid using the ‘New Guide Layout’ tool and practice aligning shapes to it. Do this today, then do it again tomorrow.
Make it a habit.
GFXprojectality exists to help you master these tools and techniques. We break down complex processes so you can apply them immediately.
Your designs will show the difference. Clean alignment and professional structure aren’t accidents.
They’re the result of using the right tools the right way. Homepage.